Author Archives: Cine Boot Camp Team

To all Canon Boot Camp Grads

Hey all you Canon Boot Camp Grads!

First off, congratulations on completing the Boot Camp! Second, if you think you know everything…think again!

If you've only attended Day One (formerly known as "Pro Level I") you're missing half of the Canon Boot Camp experience.

Here's an example for you: Lynn Thurman, DP and Still Photographer, attended Pro Level I about a year ago. Now that we've revamped our workshop into a two-day fun and informative extravaganza, she decided to come back to finish what she started. She came back to attend Day Two, but we wanted her to come to the first day as well, where we cover the basic and the nitty-gritty info on cinematography and the Canon HDSLRs. So we threw in Day One as a "refresher" so she could refamiliarize herself with the technical data and meet everyone she would be working with on Day Two. This "refresher" plus Day Two package came out to $399, that's quite a deal! 

Here's what Lynn had to say about her second experience at the Canon Boot Camp:


So on Day One, Lynn learned how to set up her Canon 1D's menu properly for video, learned cinematography and lighting basics, tested out gear, and met a bunch of great filmmakers. On Day Two, she helped shoot a PSA on safe driving, which included 5 set-ups. That's a full weekend of learning and doing! 

These days the Canon Boot Camp is only available as a 2-Day class, as Pro Level I isn't available a la carte (unless it's a private Boot Camp). If you are a Pro Level I only Graduate, come join us for Pro Level II in October.  You may attend Pro Level I as a refresher just like Lynn did, and get your hands dirty on Pro Level II.

Smooth Shooting in Rough Seas

Good Ol’ John

Intolerable Working Conditions

Relax John

Panama Canal

We’re Still Working for Them

In the last 20 years or so I’ve produced over three hundred videos for Princess Cruises, Celebrity Cruises, Carnival Cruises, Crystal Cruises and a variety of others. I’ve spent well over three years of my life, one or two weeks at a time, shooting films and videos on various cruise ships all over the world. I know it seems like an ideal occupation, full of blonds in bikinis and martinis in Martinique…and, uh, well, sure there is a lot of that.

But it’s hard work too! Really it is!

I’ve had my share of adventures (and misadventures), moments of breathtaking beauty in far away places and panicky mornings when nothing seemed to be going right. It’s pretty tough to have a major mechanical malfunction when you are hundreds of miles out at sea and the nearest camera rental agency is a continent away. It’s also not so great when you’re hauled in front of the Captain because one of your “elder statesman” actors has been harassing an assistant purser. So you have to really expect the unexpected and be extremely flexible to come back with the goods.

Rules of the Road

I’ve developed some golden rules to minimize these rogue waves you run into when doing oceanic production. The first one is: Always contact the Captain beforehand so he knows you are coming and what to expect, and always meet him as soon as possible when you get onboard. The Captain is the complete dictator of the ship. His word is law. I’ve met some Captains who were the nicest people in the world and some who were incredible jerks. It doesn’t matter. You need to make friends with him as soon as possible. If something goes wrong or you really, really need something done, you have to have the Captain on your side. The Purser is the one you deal with on a day-to-day basis but the Captain is your trump card if you really need it. Case in point, the “elder statesman” actor mentioned earlier.

Good Ol’ John

This guy looked like a million dollars but was completely nuts, something I didn’t find out until we were well underway on a cruise that took us through the Panama Canal. I actually had my doubts after the first day of shooting which involved our actor just lounging around in a splash pool with a beautiful co-star, sipping colorful drinks with umbrellas in them. The next day he refused to come out of his room citing “intolerable working conditions”! This wasn’t a warning sign; it was a gale force winds-hurricane flag! Fortunately his co-star conspired with me to keep him under control between the hissy fits and tantrums. My Assistant Director and I shuffled the shot list so that all of the scenes where we absolutely needed him were shot first. We walked on eggshells for several days including shooting some beautiful scenes as we went through the Canal requiring our actor to lounge on a balcony and point to selected parts of the passing jungle. At the end of this day he announced that he just couldn’t continue such a horrific schedule without a significant upgrade in pay. I had suspected this was his motive all along. I was reviewing our shot list when I heard the Public Address System call me to the Purser’s Office. That is where our Captain, the Purser and a Purser’s Assistant all confronted me with the charges of sexual harassment committed by one of my “crew”. Ulp!!

The Meeting

The Captain was very upset and threatened to shut down our shoot. Of course this would have been a complete disaster and ruin any standing I had with the cruise line not to mention dooming our shoot. Fortunately, I had made the effort earlier to meet with the Captain and assure him I would be responsible for all of the actions of my group. Now was my chance to prove it. The Captain was at least willing to listen to my story. When I explained that we were having all kinds of trouble with this guy as well, everyone became more sympathetic. When I told them I had essentially shot all of the scenes I needed with him, everyone smiled. Long story short, the actor was off-loaded in Panama City with a plane ticket home and we continued shooting all the way up the coast to Acapulco. Fortunately, my gaffer had a similar head of silver-grey hair and so we shot several scenes where all you could see was our actress and the back of her “husband’s” head. No one at the cruise line ever noticed and we have continued to shoot for them for years.

Daniel Pearl ASC Evaluates the Canon Boot Camp

Daniel Pearl, ASC. Canon Boot Camp Survivor

Possibly the most well known Daniel Pearl movie is “The Texas Chainsaw Massacre,” Daniel’s very first film after completing his Masters at the University of Texas. That legendary horror flick was followed by a very productive career including music videos (the Billie Jean music video comes to mind) as well as commercial photography.

Daniel came to the Canon Boot Camp to learn digital video capture and catch up with the latest advancements. He’s the kind of guy you’d love to have coffee with and just shoot the breeze for a couple of hours to hear all the filming horror stories and adventures that went along with the actual films.  But here’s what Daniel Pearl, ASC, had to say about his experience at the Canon Boot Camp:


Daniel Pearl, ASC Reviews the Canon Boot CampI thought the class was really good. I thought it was very – you know – the knowledge was very through. You guys were quite good about answering every question I had. I’m a guy who just, you know, I’ve come from a sewing machine and a black box that runs at 24 frames a second. I don’t know – almost nothing – about the digital world.

There’s a lot of things I don’t know, and you guys, it was great! I mean, I would say although I’ve got quite a lot of experience as a cinematographer, I understand a lot about cinematography, I know very little about digital capture, and you know, it was great. I was never in a fog [which] you guys were very good about, it was very clear. And [the instructor] was very good about answering my questions.

I absolutely would recommend it, yeah, absolutely. I thought it was very through like I said – there was no doubt, everything was quite clear and no hesitations to answer my questions. I can’t even imagine what could be missing…

Daniel Pearl, ASC


Goodbye Light Meter

Eric Schmidt, DP Visits The Association’s Canon Camera Classes

If you are coming fimages
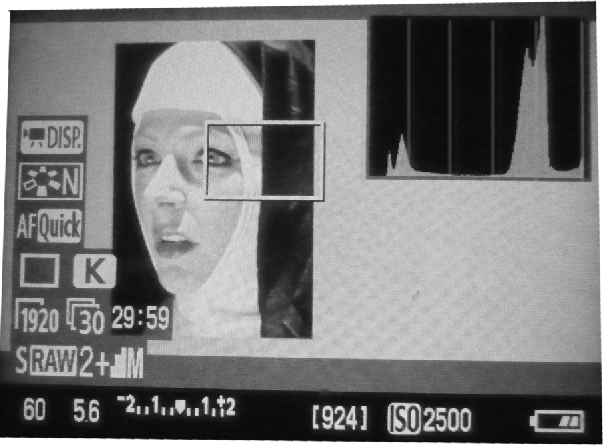
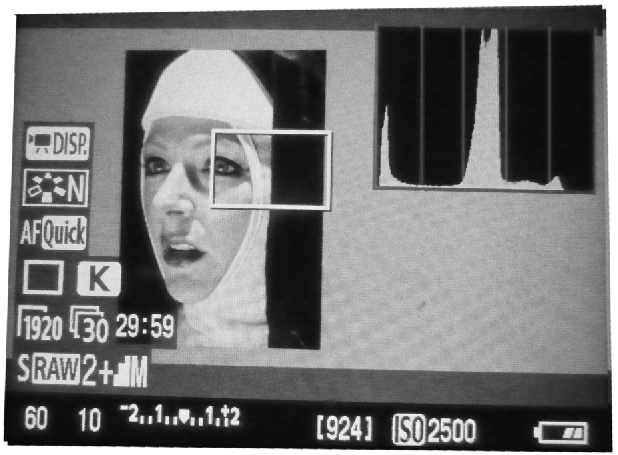
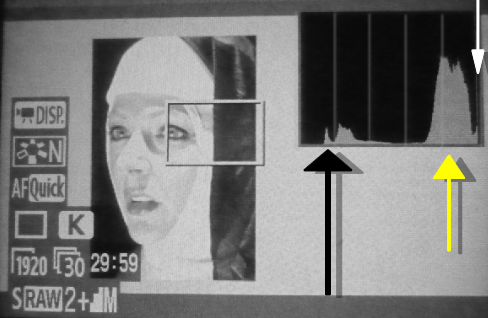
rom a film background, chances are that you are very attached to your light meter and perhaps have backups upon backups. In the DSLR world, DPs have been familiarizing themselves with the histogram in the camera to measure the accuracy of their exposure and the balance of the blacks, greys, and whites in the picture. What they are aiming to do is avoid blowing out the highlights in the picture where information would be irretrievable in post-production.

When looking at your histogram, the white spikes on the right side should never be slammed against the edge. This ensures that the detail in the whites will be retained and leave you more to work with down the line. Because once it’s gone, it’s gone.

Many seasoned DPs may have trouble letting go of the trusty sidekick they’ve had with them their whole career. It can be difficult to transition from a light meter to an in-camera tool to judge your picture. Now you’re expected to trust a digital graph to tell you how your exposure is? Eric Schmidt, Director of Photography of films, music videos, and commercials (surely, you’ve seen the Dos Equis ad), had to learn to trust the histogram while filming a feature film on the 5D Mark II with Mark Pellington. In “I Melt With You“, the shots are 100% Canon HDLSR footage and the exposure was judged by a histogram.

histogram

Above is an example of a properly exposed histogram where the spikes depicting the whites are not up against the wall of the histogram, therefore retaining detail. The grey spikes in the middle depict the skin tone of the actress. The black spikes are up against the left wall and therefore “crushed”, yet they manage to still retain some detail on the fabric.

During his visit to the Canon Boot Camp, Eric talks about his fears of the histogram and how he came to embrace it.


Notes from the Manual: Histograms Part V

Understanding Histograms: Part V

Excerpt from the Canon Boot Camp Manual


Stopping Down the Exposure

The shot below shows what happens if we “stop down” the iris. All the values have moved to the left. We still can’t tell if the whites are blowing out because they are “squashed up” against the right side.

Stopping down the iris

Putting the skin tones in the middle.

The shot below shows the exposure most Hollywood DPs would like.

Getting skin tones in the middle of the histogram

The WHITES are well away from the right, GREYS (skin tones) are in the middle, and the BLACKS are squashed up against the left side. We’re probably losing information in the blacks but judging from the blacks in the picture, that’s okay. Setting the correct exposure requires judgment. Sometimes you want to “keep” the blacks (move the blacks away from the “wall”. Sometimes you want to “blow out” the whites. Sometimes you want to “keep” the whites. Below are some more examples of situations where you might want to keep the blacks or blow out the whites.

REVIEW

Below is the complete nun photo. The “histogram” we inserted is the type used in Photoshop.

A Well Exposed Nun Photo with Histogram


We can see the well-exposed picture has retained detail in the WHITES (the whites are not squashed up against the right.


The SKIN TONES are mostly in the middle.


The BLACKS are squashed but she’s in a black habit in a black room, so that’s just what we want.


Download the full Canon Boot Camp Reference Manual from our Facebook Page

Pro Photographer Gloria Baker & The Canon Boot Camp

Gloria Baker's Experience at the Canon Boot Camp

Gloria Baker is a New York based photographer with considerable experience. Her 20 year career includes a client list spanning AIG, American Express, BlackRock, CR Bard, Fortune Brands, General Reinsurance, KPGM, Louis Dreyfus Group, New York Life, PwC and Pfizer. Gloria attended the Palms Springs Photo Festival and included the Canon Boot Camp in her agenda. In one weekend she updated her digital filmmaker skills and brought them to the next level. Her review of the Canon Boot Camp follows:


It exceeded my expectations and I thought the people were very professional. I was stunned by the amount of technology and equipment that we had at our disposal. Because, I've been at seminars before where I felt like the money was not well spent. I did not at all feel that way in this workshop; I felt like it was worth every penny. I was very happy that I did it. I feel much more comfortable working on a video project at this point than I did before I took the class.

Your class approaches different levels, and I think even if somebody is even relatively experienced, which we had some people in the class who were very experienced with video, and they still contributed a lot and learned a lot. You made a lot of different kinds of people with different backgrounds and different experience levels feel like they were contributing. And I think you really were good about that. And I think that's a special aspect.

Gloria Baker
Still Photographer, NY
 

Notes from the Manual: Histograms Part IV

Understanding Histograms: Part IV

Excerpt from the Canon Boot Camp Manual

Blown out whites Whites and Grey Whites

We’ve zoomed into the nun’s cowl by her temple. (see below)

Blow out whites, white and white greys pic 1

Blow out white, whites and white greys Pic 2

Some pixels are reporting grey/white dots and some darker shades of grey, but none are completely blown out (“whiter than white”) and none are black-black. This is a sign of good exposure, i.e. no blown out whites. There is some black in the picture.


Draw the histogram for the picture above:

Print off the picture below, and try your hand at drawing in the histogram for the picture above.

Blown out whites, whites and white greys

Blown out whites go off the histogram.

Below is an example of the nun’s picture overexposed, i.e. blown out whites. This is how the histogram looks on the 5D (and 7D). There are six faint white lines running vertically across the histogram.

Example of blown out whites going off the histogram

WHITES – The far right line (white arrow) is the edge of the histogram display. If values go past this point they disappear off the graph. They are “clipping”, which means there is no information…. just whiter than white. All detail is lost past that point.

The histogram squashes blown out whites up against the right side of the graph. (see white arrow). You can’t actually tell how much data you’ve lost. It just disappears off the graph and shows you a very thin spike along the edge.

GREYS – The greys of the nun’s skin tones are indicated by the yellow arrow. They are much too far to the right (over-exposed). Skin tones should be closer to the center of the histogram.

BLACKS – Also, see how the blacks (see black arrow) have moved away from the left edge of the histogram. In this case.the blacks won’t appear black but are “milky black”. The nun’s black robes won’t be black but dark, milky grey. Milky blacks are not good.

Download the full Canon Boot Camp Reference Manual from our Facebook Page

Notes from the Manual: Histograms Part III

Understanding Histograms: Part III

Excerpt from the Canon Boot Camp Manual


What each pixel “sees” and reports.

Now we’re going to zoom into the picture below with our 15 pixel camera. We’re going to see what light value each pixel “sees” on a tiny bit of the picture. This is the value the pixel reports. These reports are grouped and built into a histogram.

Zooming in on what the pixel sees Pic 1

Zooming in on what the pixel sees Pic 2


Zooming in on what the pixel sees Pic 3

Zooming in on what the pixel see Pic 4

Zooming in on what the pixel sees Pic 5

Below is what our 15 pixel sensor sees of the picture above.

What the Pixels see

There are pixels that are mostly black and some “black/grey” to “dark grey” and one pixel that is closer to white but not white white….not 255 on the histogram.

DRAW what value each pixels on the sensor ”sees”. In other words, count the nearly black pixels and draw a column representing them. Count the “darker blacks” and draw a column of those. Count the pixels reporting “white” values and draw a column of those. Count the grey values into groups and draw a columns of those groups, i.e. milky black, black grey, dark grey, Or name your own groups and total the number of pixels in each group.

Draw your own histogram


Download the full Canon Boot Camp Reference Manual from our Facebook Page

Maderize Me!

We’ve been Maderized! Maderization is going to be the next big thing in Hollywood. What exactly is Maderization? It’s hard to describe, yet so simple. In one word, Maderization is magic. Magic is intangible, and so is the essence of Maderization. You can’t point at it and say: “there it is” because it isn’t one thing. Allow me to rewind and explain how I first encountered Maderization and The Maderizer himself, Mr. Ken Mader (an award-winning Director, Editor and Cinematographer).

I was editing one of our Canon Boot Camp shorts, The Sonnet, and had grown tired of sifting through hours upon hours of footage. Everything was pieced together on the timeline according to the storyboard but I was left uninspired. I just knew something was missing that could propel this piece to what it should and could be. The story we were aiming to tell is beautiful, so I wanted to do it justice. However, the clips that were layed on my timeline were just that, clips, not a story. Something about it almost seemed lifeless. My work with the piece was done, and I didn't know what else to do with it, so I sent it to Ken to finesse (at that point, I had not yet created the term "Maderize"). I was definitely worried that what we had on paper was not going to be reflected on screen, but all I could do was give it to Ken and wish him luck. 

A few days later, I went to Ken's edit bay to see what he had done. The opening credits scrolled past, and I thought it looked good. The next thing I knew, I was entranced in the very story I helped to develop, not sure what was coming next, as if I was watching it for the first time. The same clips I had layed on the timeline were still there, but they seemed new and alive. It was the strangest thing to see something I had stared at for weeks seem new and different, and of course better. The very first words that came out of my mouth were "Thank you Ken! You saved it!!". To this day, I still don't know what he did to Maderize it. He turned the short from "blah" to gold. I don't know what it is, but I won't lose sleep over figuring it out because I know that when I'm stuck, I'm sending my video to The Maderizer for an intense Maderizing session. 

Here is the final Maderized product, The Sonnet

Now you see why the term "Maderize" had to be invented. There isn't a word in the dictionary (yet) that describes what Ken can do, which is to bring a project to its best and set a higher standard of production.

Sometimes (or always), you just need a true professional storyteller who will guide you out of the apocalyptic production jungle. Luckily, The Maderizer is training me to be his first Maderite and someday this HDSLR Ninja will become a Maderization Ninja, aka a magician. 

Here is another video Maderized for The Association:

Get Maderized! Contact The Maderizer to increase your production value and check out his work at kennethmader.com and nightfall-studios.com. I've been Maderized!

Do you have a Dracula Pay Per Click campaign?

Is a badly performing marketing plan sucking your company dry?

Dracula

You spend a ton of money on promo and get one lead?

Or NONE!

It’s a bloody shame !

But you don’t have to put up with anemic marketing.

What if I could show you how to make your promotional dollars go four to eight times farther? So you could get 4 to 8 leads for your marketing dollar, instead of one?

Wouldn’t it be great to get EIGHT responses instead of ONE out of a hundred (1%)?

The Association has perfected a method of getting four to eight times the industry average.

The Association’s Stat – 4 to 8 times the industry average.
The Association’s Pay Per Click campaigns perform 4 to 8 times better than the industry average?

HERE’S THE PROOF

Below is the Google Report: The Association’s PPC ads are pulling an average of 8.48% !!

The proof – 8.48% conversion rate
How do we do it?  We use proven, scientific marketing methods that WORK.

Wouldn’t you like your email stuffed with leads in the morning? Clients have literally asked us to turn off the marketing campaigns because they were so backlogged following up on the leads we generated.

How does this apply to your marketing?

Let’s say you spend $100. on your promo marketing. Let’s say you make a $100. on each close. Well, if  you only get one reach out of the hundred (a 1% return), that reach cost you $100. If you close that one lead, you make $100. So, you break even. If you don’t close that reach, you just lost $100. This is why people stop marketing. THEY’RE LOSING MONEY. DUH!

There’s NO WAY you can EVER, EVER, EVER make money with anemic marketing. Period. But we still see people throwing money away on marketing that only gets a 1% response.

POWER MARKETING – But with The Association’s scientific methods,  you can get four to eight leads.

Applying this to the example above, instead of a lead costing  you $100,  you know get 8 leads which cost you $12.50 per lead.  If you close a $12.50 lead, you make $100 (you pay back your marketing investment of $100). But here’s the good news. If you close two $12.50 leads you pay back your marketing expense and you make another $100. If you close three you made $200. profit. This is the secret to paying for your marketing and making a lot of money. This is “power marketing”!

Be smart. Let us put our scientific methods work for you.

You’ve seen the proof. Now, call us today.  (818) 841-9660.

This is the time to grab market share, when everybody else has cut back. Power Marketing will give a better return on your marketing dollar and increase your profits. Break out of anemic* marketing. Call us.

*(def. anemic – lacking force, vitality or spirit.)

(def. anemia – Anemia is a condition in which you don’t have enough healthy red blood cells to carry adequate oxygen to your tissues. If you have anemia, you probably feel tired a lot. Etymology – anemia – 1824, from French medical term (1761), Mod.L., from Gk. anaimia “lack of blood,” from anaimos “bloodless,” from an- “without” + haima “blood”)