Monthly Archives: July 2012

What I learned from dogs about the internet

If you’re wondering why the Internet isn’t bringing tons of business to your door you’re not alone. Most people we talk to feel the web isn’t living up to their expectations for new business.

A lot of people embraced the Internet and it’s promise of a new life with abundant cash flow. Most of us suffered through a huge learning curve to master new terms and technology to be able to “surf the web”.   Then, NOTHING but the sound of crickets!

Why?

Well it makes us feel naive, but putting our website up was like taking out a single line ad in the New York City Yellow Pages and expecting business to flock to our door. You can find the shocking news on the Google blog site <http://googleblog.blogspot.com/2008/07/we-knew-web-was-big.html> which says that a year and a half ago Google crossed a huge milestone of 1 trillion (as in 1,000,000,000,000) unique URLs on the web at once!

So I hope you see the task ahead if you want to be found on the web.  You have to be more relevant. You have to increase your presence on the web. And now we come to dogs and what I learned from them.

We all know dogs mark their territory.  The more marks the bigger the dog, or at least that’s what dogs think, judging by the way they pee on everything stationary (and some thing’s not so stationary).

Pepe and MaxSo when Pepe the Chihuahua marks every tree for six blocks he is building his “presence” in the neighborhood. He’s now a big dog even though he’s twenty times smaller than Max, the Great Dane.

It’s the same game Google plays.  Google doesn’t know how big you really are. All Google knows is how many “trees you marked”. What does that mean?  Make 60 websites? Add 600 pages to you website? No. It’s much simpler than that.

On the web you increase your presence by having lots of inbound links. (Inbound links – d. Inbound links are links from pages on external sites linking back to your site.)

One way to get lots of inbound links is by writing interesting blogs, filled with interesting things that your target audience is interested in. Each blog has a link in it back to your site. You get bigger in Google’s eyes the more people read your blogs and the more they click on that link at the bottom of the blog that drives inbound links to your site.

So if you’re feeling like your very insignificant on the web, write some blogs, and like Pepe, the Chihuahua, you’ll be a big dog in Google’s eyes.  Writing blogs doesn’t have to be hard. We’ve found some easy tips to make blogging a breeze.  Go, Pepe!!

Gloria Baker, Still Photographer, Gets Hands-On at the Canon Boot Camp

One of the wonderful people we had a chance to meet at the Palm Springs Photo Festival in April was Gloria Baker. A long-time still photographer, Gloria is dedicated to her craft and is sought out by companies as AIG, American Express, BlackRock, CR Bard, Fortune Brands, General Reinsurance, KPGM, Louis Dreyfus Group, New York Life, PwC and Pfizer.

After attending our Canon Boot Camp, Gloria had the following feedback:

"Your class approaches different levels…you made a lot of different people with different backgrounds and different experience levels feel like they were contributing…and I think that's a real special aspect of it."
                                                                             Gloria Baker, Still Photographer


We are looking forward to working with more still photographers and increasing their video skills. Join us! We'll be visiting the Brooks Institute in Ventura, CA in August, and most months we have our Canon camera classes at our headquaters in Burbank, CA. Do you have a location that's desperate for HDSLR training? Let us know! Email me at nancy@theassociation.tv with your suggested locations, or comment below.


Still Photographer Takes the Leap to Video at the Canon Boot Camp


In April 2012, The Association was invited to bring the Canon Boot Camp to the Palms Spring Photo Festival and teach still photographers HDSLR video techniques. We had just returned from Prague doing just that, but this was the first time we had worked exclusively with still photographers. It was then we realized our Canon camera classes were probably a vital step up for many still photographers who already knew much about the camera, but not very much about the video aspect of Canon’s cameras. ray_carns

Ray Carns, Fine Art Photographer, signed up for our 2-day course and got his hands dirty with our hands-on training:

“I would definitely recommend it for anyone that’s interested in getting into video.”
Ray Carns, Fine Art Photographer

Ray is a photographer based in Phoenix, AZ. He has shown work throughout the U.S. since 1992, in group and one- and two-person exhibitions. His black and white reticulated images are created using a chemical reticulation process, a process he has used for over twenty years. Ray has recently begun photographing in color, and now, we expect, using video!


Thinking Outside The Box: Lighting A Subject

Jeff Bauer contributes “Thinking Outside The Box,” an ongoing series of short columns covering a wide range of topics within the video world and how to use creativity, ingenuity, and problem solving to achieve unique results across all mediums.

There are so many different ways to light a subject that it would be impossible to list them all out. It depends on aThe Fountain wide range of technical factors such as the the size of your location, the time of day, types of lights, and creative factors like the story genre, and production design. Now if you spent enough time in pre-production, a lot of these details should be available, making a decision on a lighting style much easier.

Once you have enough details from the production, you’ll want to start planning out lighting basic diagrams and figure out where lights should go. I recommend that you watch films in the similar genre that you really like or that were critically acclaimed. Take some notes, scribble some basic diagrams down, and maybe try to recreate a scene that stands out to you. Then watch a few movies from the same genre that you hated or were received poorly. By analyzing the positives and the negatives from each film, you will have a better idea of what what you want to do and how you’ll do it.

Next, it’s important to think about the direction of the scene light and the different types of lights you want to use. If you don’t have any lights to use, you will have to rely on natural light and reflectors to achieve a proper exposure. The classic way to light a scene involves what we call a Key Light, Fill Light, and a Back Light. This describes the main source of light, the complimentary light, and the separation light. Of course how you arrange these lights with determine the type of look a you will get.

Finally choosing hard light or soft light can dramatically effect the way a scene looks. With gels and diffusion, you can create light that is more evenly distributed and softer looking, where as a plain light will cast hard light and in turn hard shadows. There are so many ways to mix and match and combine these techniques into something original, and only with practice will you get better. Go out and shoot something!


To get hands-on training on filmmaking and lighting, come to our Canon camera classes. The schedule is listed on the right side of this blog.

Name that tune: Da-da-da-daaa-da-da-da-daaaa…

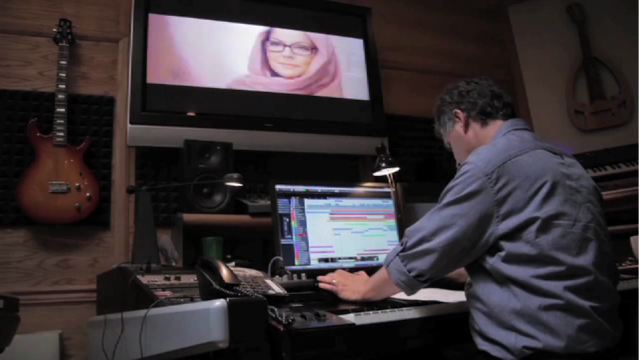
Bruce Chianese of Mad Cow Studios By now, you’ve hopefully seen the romantic short that our Canon Boot Camp participants shot. If not, watch it now. If you’ve seen it already, watch it again. Or should I say: “listen to it again”? If you’re like us at The Association, you have probably been humming or whistling the highly infectious melody over and over again.

Who is the man responsible for our infectiousness? That would be Bruce Chianese, composer extraordinaire. “The Sonnet” would not have been “The Sonnet” without its music. Bruce adds charm, romance, and excitement to the video with his original score. He enlisted the talent of Gigi “Gee” Rabe and Phil Feather. Gee is LA’s Accordion Diva and filled the studio’s hallway with about 5 different accordions. She and Bruce were determined to find the right sound for “The Sonnet”. They went with a “wet French tune” to achieve the provincial melody. Phil performed the flute and the saxophone to give the piece the whimsical yet sensual vibe.

To find out more about Bruce and his studio, visit his website.

We’d like to share a behind-the-scenes video of the making of the score. Watch as Gee and Phil skillfully master their instruments to create the delightful sounds of music. Let’s not forget Bruce, who wrote, directed, and played piano on “The Sonnet’s” score. Not only did he provide music, but also further contributed to the piece by laying in ambient sounds and sound effects. To preserve the Hollywood Magic, I won’t say which sounds are effects and which are genuine (but you can take a guess and leave it in the comment section!).

DARPA Develops Futuristic Gigapixel Camera Sensor

The United States Department of Defense’s research agency (DARPA) recently developed a new, hemispherical camera sensor that utilizes an array of small cameras coupled with extremely efficient electronics to create images up to a gigapixel in size. The camera they created with this new technology has a 120 degree field of view, putting it in ultra wide angle lens territory. The team behind the project also designed the whole thing to be scalable in the future, opening the door to higher gigapixels and smaller sizes.

Even though more megapixels doesn’t necessarily mean a better image, it’s really great to hear about projects like this. When electronics become smaller and more efficient, I wouldn’t be surprised to see gigapixel DSLR style camera in the future.  Of course the ability to render, edit, and share these photos would realistically need technology much more advanced than what we currently have, but we’re getting closer.

Gigapixel Camera

This level of detail could however cause headaches for filmmakers in the future. It’s already distracting enough to see every single pore on the television news anchor with HD, and with some mixed reactions to 48fps, the last thing we would want would be a level of detail that seems too real. I don’t want to be able to pick out fake set pieces and movies shouldn’t look the same as the super bowl. The processors would also have to be extremely powerful to scale or render video at such a large resolution.

Ether way though, I’m certainly excited for future camera technology and whatever it brings. If you’re interested in learning current Canon HDSLR technology, be sure to check out our Canon camera classes.

Which version of the Canon E1 Plug-in for Final Cut Pro are you using?

Image courtesy of www.learn.usa.canon.com

image courtesy of www.learn.usa.canon.com

If you’ve been to our Canon camera classes, chances are that you learned and still use the workflow we taught for Final Cut Pro. We’ve always recommended making 3 copies of your footage, and this still stands to be true.

However, if you are operating on the Canon plug-in E1 v1.2 or v1.3, it’s time to update your workflow!

We always made a point to copy the entire DCIM folder to maintain the card’s structure to “trick” the computer into thinking that it is working off of the CF card directly. This was true of the Canon E1 v1 plug-in, however, Canon has worked on updated versions of the plug-in that are less of a diva. The good news is you may now select the best clips from the card without having to copy over the bad takes too. This will definitely hurry the process along for the DIT, the assistant editor, and the editor.

Here is the new workflow we follow:

1.     Have 3 hard drives to make identical copies of your footage.

2.     Label your project folder and create subfolders for each scene

a.     If it’s a multi-cam shoot, create additional subfolders in the scenes folders.

3.     Insert your CF card into a card reader

4.     Open the card on your desktop to see its content

5.     Copy the DCIM folder as a whole OR just the .mov files that you want to work with

6.     Make 3 copies directly from the card (this way if one hard drive is corrupted, you aren’t copying corrupted footage over to another drive)

7.     Launch Final Cut Pro 6 or 7

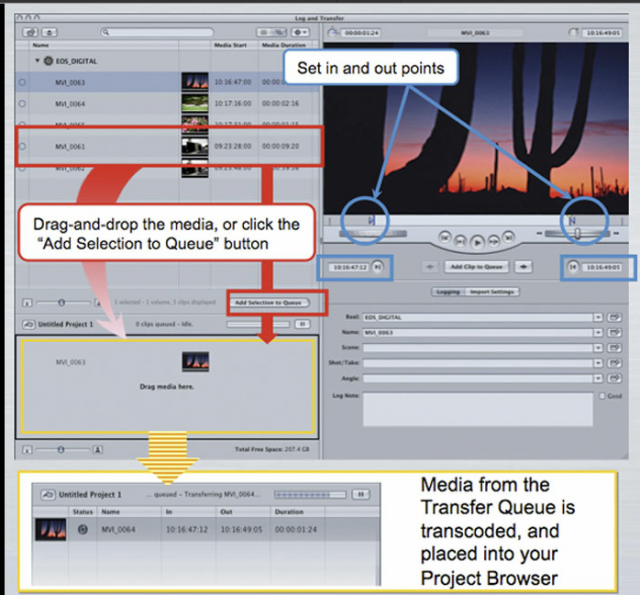
8.     Go to File > Log and Transfer

9.     In Log and Transfer window go to the gear icon for Preferences

10. Select Canon E1 and set your preferred format, such as Apple ProRes 422

11. Drag the clips you want to transcode into the queue (you can also add in and out points to log sections of clips)

12. Your clips will be added directly to your bin.

Remember to eject your card properly from your computer just as you would eject a hard drive.

To sum it up, you no longer have to copy the DCIM folder when you are backing up your files. Simply copying the .mov files from your card will not interrupt your workflow when using Canon’s plug-in E1 software 1.2 or 1.3, if you are operating on Final Cut Pro versions 6.0.6, or 7.0.3 or later.